Cart
Your cart is empty

ALFREDO DE BENEDICTIS FOUNDER | HAIRSTYLIST

Alfredo De Benedictis is an Italian-British hair stylist and salon owner with over 40 years of experience. Since 1989, his passion for innovation has led him to create groundbreaking hair tools that minimize stress on the hair while delivering flawless results. From the iconic Rootpermer and Wellformer of the ’90s to the global hit Babyliss Curl Secret, Alfredo’s mission remains the same—developing tools that protect hair health without compromising style.
It’s 2025, and we want a styling tool that can do it all. Where once we wouldn’t have trusted a hair straightener to produce beautiful waves or curls, today, there are clever devices that can curl, wave, or smooth and straighten as required - triple-threats, if you will.
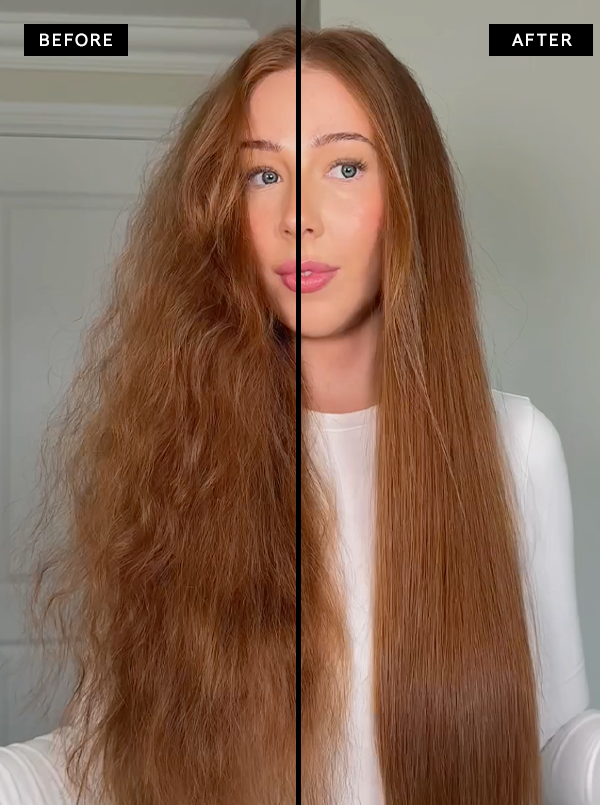
One such is the KEEO Genius Pro+. We created the product we wanted to use, and now we’re sharing our wisdom on all things hair.
In this blog, we’ll explain the importance of choosing the right straightener, take you through some curling techniques step-by-step, and offer some expert tips to keep your hair curls looking fresh and defined for longer.
Not only is it convenient and cost-effective to have one tool instead of three, but modern designs such as the KEEO Genius Pro+ have been created to cater to your every hair whim.
Want curls one day and glass-smooth chic the next? No problem. Best of all, our intelligent design protects your hair as you style it, using gentle heat and patented technology to achieve your ultimate hair goals.
Why not check out our recent results helping women across the UK (and beyond)
We’re biased, but we truly believe our hair straightener is the best on the market.
Not only does it have patented smart-glide contoured plates for no drag, but the protective air gap reduces tension by up to 70%.
The only criticism of our original model was its single heat setting, the optimal 190°C.
We listened and developed the PRO+, the first tool to offer custom heat, custom tension, and total control. The adjustable temperature setting starts at 190°C, but can be increased to 200°C or 210°C for naturally thick, coarser hair that may require a higher temperature.
Also known as the S-bend technique, this is a more defined S-shaped wave which looks fantastic on all hair lengths. This one requires a bit more practice, but is well worth the effort.
Uneven curls can occur if your hair isn’t sectioned properly before curling.
Your hair should be evenly wet, then apply a good quality curl cream and brush through to remove tangles and knots.
To evenly section, divide your hair into three sections - the top, middle, and base. Or just the top and base to begin, if you prefer.
Use your second fingers to push and lift hair slightly away from your temples, twist, and secure with a clip.
Style the base and middle sections, then secure with a clip at the nape of your neck to prevent snagging styled hair.
Turn your attention to the top section. Unclip and repeat the temple manoeuvre to separate into the top and middle. Secure the new, smaller top section and style the middle.
Finally, work on your crown and face-framing curls to achieve your ideal look
You can experiment with horizontal and vertical parts depending on the final style you are trying to achieve.
If you want your curls to last, you must let them cool and fully set before you start styling. Here a some quick tips for curls with serious staying power:
While curls look stunning worn down and natural, we all like a little variety in our looks, so here are a few of our favourite curly girl hairstyles:
Put the focus on your best features and protect your hair.
@jazvnessa Curls & messy buns go hand in hand 🤝🏼 #messybun #curlybun #summerhairstyles #curlyhairstyles #curlyhairinspo ♬ forever by drake - rae.kk2
Great for hot days and days and festivals.
@ithinkitsbella its been way too hot to wear my hair down lately ☀️ #curlyhairstyles #summerhairstyles ♬ Gud - Monika Moni
Looks pretty dressed up or down.
@kyramilann Part30|| side part half up half down with curl🌸 #curlyhairstyles #tutorial #easy #fyppppppppppppppppppppppp ♬ original sound - idek
Elevates a curly ponytail or a down-do.
@itsmikaylanicolee Formal Curly Hair Tutorial 🥂✨. Coming at you guys with holiday hair inspo 🥰. #curlyhairstyles #curlyhairtutorial #hairtransformation #holidayhairstyle ♬ gloria - Kendrick Lamar & SZA
Add volume and definition to your curly ponytail.
@by.loren No more floppy ponytails
♬ Blame It on the Rain - Milli Vanilli
Whether your hair is super straight or naturally kinky, you can have the goddess curls you’ve always dreamed of; it's just a case of working with your hair rather than against it. A quick reminder of our top tips:
In theory, yes. There are tips and tricks for curling your hair with a standard flat iron without succumbing to the dreaded kinks, such as turning the instrument before fully closing to avoid clamping down and ‘creasing’ the hair. However, the KEEO Genius’ patented contour plates and air gap shape, and smooth without clamping, so you don’t get the kinks that other straighteners create.
To find the correct heat for your hair type and texture, follow our guide to curl patterns and why they matter. Always start at the lowest heat and gradually increase it as needed.
The Genius Pro+ Straightener starts at 190°C, and can be increased to 200°C, 210°C, should your hair require a higher heat.
If your curls are falling flat by the end of the day, they may be weighed down with products.
Try not to wash your hair the day you are going to curl it, and skip the conditioner, or only use it sparingly on the ends of your hair..
If your hair is fine, stay away from silicone-based styling products, waxes, and oils.
Ringlets may not be your desired final look, but avoid brushing them out until your curls have cooled. Otherwise, they may relax too much and straighten out.
You should also avoid touching them too much throughout the day, as this can cause them to relax and loosen, losing their shape.